Sep 15, 10 by Juan Lebrijo about weblogic, JDeveloper, blog
Vamos a instalar estos dos productos en un Windows XP, en una máquina de VirtualBox. La versión elegida es la 11g - 10.3.3.
Podemos descargar todo el software de la página de descargas de Fusion MiddleWare.
Para instalar WebLogic Server 10.3.3 descargaremos el paquete wls1033_win32.exe. Y a través de wizards lo instalaremos en C:\Oracle\Middleware. No tiene ninguna complicación más.
Luego podremos crear dominios separados con su herramienta de configuración en C:\Oracle\Middleware\wlserver_10.3\common\bin\config.cmd
Yo lo he instalado a parte pero con el paquete de JDeveloper viene un Weblogic embebido que podemos utilizar para nuestros desarrollos. Quedaría en el mismo directorio organizado si instalamos JDeveloper en el raíz de Middleware.
Para instalar JDeveloper 11.1.1.3.0 descargamos jdevstudio11113install.jar. Y ejecutamos: java -jar jdevstudio11113install.jar (ciertamente para linux es lo mismo).
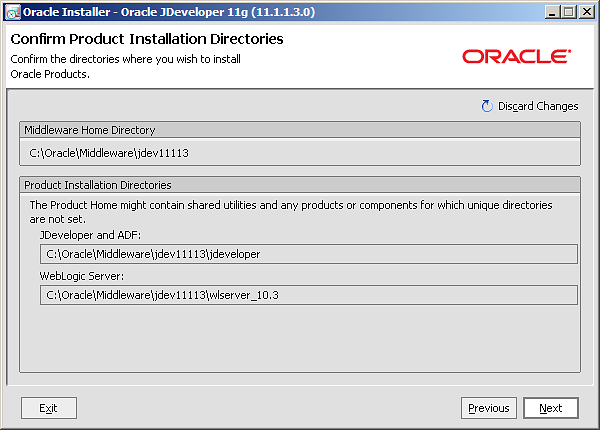
Instalamos en C:\Oracle\Middleware\jdev11113. Esto lo haremos para que nos instale un nuevo servidor embebido del IDE separado del que instalamos antes.
Utilizaremos la JDK que trae por defecto la instalación de WebLogic: Sun SDK 1.6.0_18 (C:\Oracle\Middleware\jdk160_18)
Se instalara en el siguiente path:
image001.png13.7 KB
Sep 10, 10 by Juan Lebrijo about weblogic, JDeveloper, blog
En Cloud Colmputing la manera que tenemos de desplegar nuestra aplicaciones es a través de un plugin de Eclipse que despliega remotamente las aplicaciones. Este efecto lo podemos obtener con JDeveloper, añadiéndole un servidor Weblogic remoto, que esté un una máquina aparte a la tuya (en Amazon WS por ejemplo).
Esto puede ser muy útil para:
Montar un entorno de desarrollo ágil (RAD).
Desplegar las pruebas fuera de tu máquina local que suele ser muy lenta.
Como comentaba, para un Cloud Development Style con Oracle.
Para tener las aplicaciones separadas en capas, cada capa una máquina como a mi me gusta (escalabilidad, rendimiento).
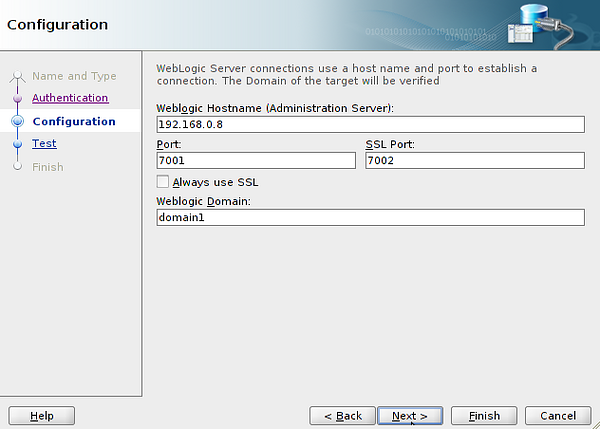
En JDeveloper > New > Connection > Application Server Connection, yo la llamaré WeblogicRemote. El configurador te pedira contraseña y los datos de red:
app_server_conf.png82.8 KB
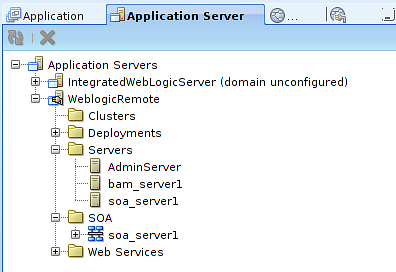
Y finalmente te ofrecerá un test a realizar que pasará si los datos anteriores se han configurado bien. Podéis ver en la ventana de los Servidores de aplicaciones el vuestro:
app_server_win.png17.9 KB
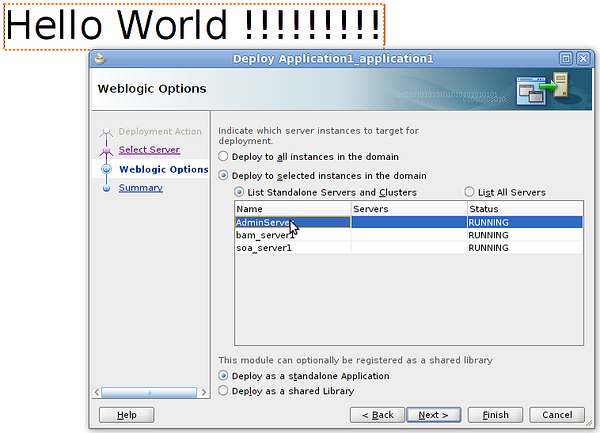
Podeis crear una Aplicación Web sencilla que tenga un index.jsp con un Hello World !!!, para probar. En el menú superior Application > Deploy . Teneis que seleccionar la conexión creada antes, y el servidor dentro de vuestro Weblogic sobre el que queréis desplegar:
deploy.png110 KB
De esta forma tenemos nuestra aplicación en: http://192.168.0.8:7001/Application1-ViewController-context-root/faces/index.jsp
Que no se asuste nadie por la URL, por que es donde se despliega nuestra vista (/Application1-ViewController-context-root/), este nombre se puede cambiar en el proyecto ViewControler > Properties > Java EE Web Context Root
Sep 10, 10 by Juan Lebrijo about weblogic, JDeveloper, blog
In Cloud Computing the way to deploy our applications is through an eclipse plug-in. We can feel this effect with JDeveloper, adding a remote WebLogic server, it is out of your local machine (at Amazon WS for example).
This can be useful for:
Implement an agile development environment (RAD).
Deploy for testing out of your machine becouse local use to be slower.
As I comment, for Oracle Cloud Development Style.
Having apps layer separated, as Ilike(scalability, performance).
In JDeveloper > New > Connection > Application Server Connection, I named WeblogicRemote. The wizard asks for the password and network configuration:
app_server_conf.png82.8 KB
Finally have the possibility to test the configuration, with success if you do it ok. You can see at Application Servers Window yours:
app_server_win.png17.9 KB
You can make a simple Web Application with an index.jsp with a Hello World !!!, to test. In the top menu Application > Deploy . You must select the last created connection, and the server in you WebLogic where you want to deploy:
deploy.png110 KB
Then we have our application at: http://192.168.0.8:7001/Application1-ViewController-context-root/faces/index.jsp
Do nor scare for the URL, that is where we deploy our view (/Application1-ViewController-context-root/), this name can be change at the project ViewControler > Properties > Java EE Web Context Root