Oct 20, 08 by Juan Lebrijo about application server, Java, blog
Tomcat es un servidor Java de módulos web, es decir, implementa la capacidad de desplegar y servir módulos web basados en las tecnologías JSP y Servlets.
Vamos a instalarlo en nuestro Debian Etch.
Para ello utilizaremos la maravillosa herramiente APT:
Recordando actualizar las fuentes previamente.
La instalación fallará, y esto sucede por que el compilador GNU de java no soporta el gestor de seguridad. Con lo que hay que decirle a tomcat que no lo utilice en /etc/default/tomcat5.5:
TOMCAT5_SECURITY=no
Si quereis, lo más fácil, es repetir la instalación, ya que APT habrá bajado y extraido los paquetes pero no los habrá instalado:
Es improtante saber que la instalación te deja como CATALINA_BASE el directorio /var/lib/tomcat5.5. Aquí es donde se va a desplegar y configurar todo.
Por último creamos un usuario manager en /var/lib/tomcat5.5/conf/tomcat-users.xml:
Instalaremos también la JDK de Sun. Para ello deberemos añadir a nuestro /etc/apt/source.list, las líneas referentes a los repositorios comerciales:
deb http://ftp.debian.org/debian/ etch main contrib non-free
deb-src http://ftp.debian.org/debian/ etch main contrib non-free
Para luego instalar le JDK:
apt-get update
apt-get install sun-java5-jdk
Ahora al reiniciar Tomcat tomará la JDK de Sun. Por cierto, ahora que tenemos la JDK de SUN si emplementa la seguridad de Java, así que restituir a TOMCAT5_SECURITY=yes
Jun 23, 08 by Juan Lebrijo about virtualization, blog
vbox_logo2_gradient.png28.3 KB Para ver la potencia que tiene VirtualBox, y facilitar la migración a Ubuntu a los usuarios que quieran seguir utilizando su anterior Windows XP en Ubuntu, vamos a ver como se virtualiza una partición de XP ya hecha desde Ubuntu 8.04.
Tenemos la misma solución para VMware Workstation en Kriptópolis, pero la licencia de este producto es de 30 días. Probé con el producto gratuito VMware Server, pero no provee la propiedad de virtualizar particiones físicas.
Así que sin duda VirtualBox es la opción más definitiva, y además es Open Source.
Asegurarnos de la edición correcta de VirtualBox
Como primera precaución debemos asegurarnos que la versión de Virtual Box instalada es la comercial. Si no fuera esta no tendríamos la facilidad de visualizar particiones físicas, desde una Máquina Virtual. Tenemos la diferencia explicada en este enlace.
Crear un Perfil de Hardware en nuestro Windows XP
La segunda precaución es crear un segundo "Perfil de Hardware" en nuestro sistema Windows XP, por que cuando lo arranquemos en nuestra máquina virtual el hardware será el estandar que simulaVirtualBox, y empezará como un loco a reconocerlo e instalarlo cargándose los drivers anteriores.
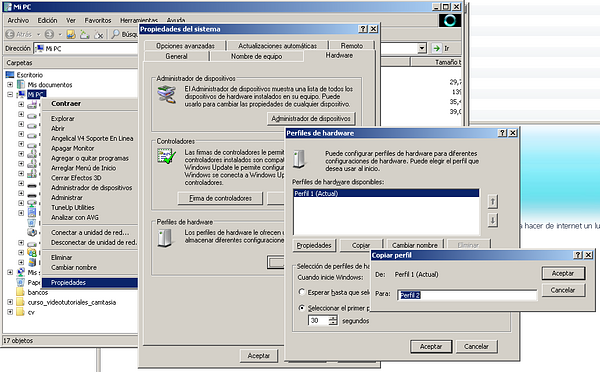
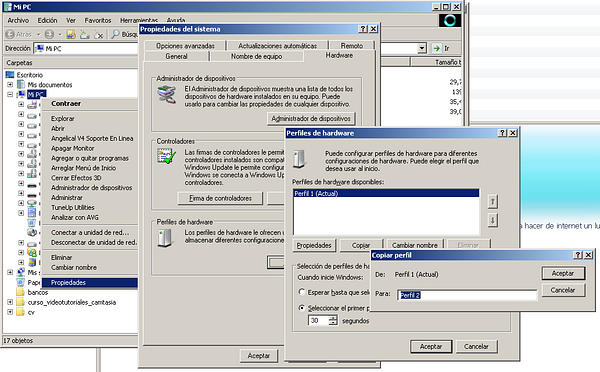
De esta forma podremos arrancar directamente nuestra partición XP desde GRUB eligiendo el perfil de Hardware que no hayamos tocado. Estos perfiles se crean en: Boton derecho sobre Mi PC > Propiedades > Hardware > Perfiles de Hardware > Copiar; y creamos un segundo perfil "Perfil 2" que será el que se modificará al arrancar por primera vez desde VirtualBox:
xp_mipc_perfiles.PNG148 KB
Crear la Máquina Virtual
Primero creamos la máquina virtual con los pasos habituales.
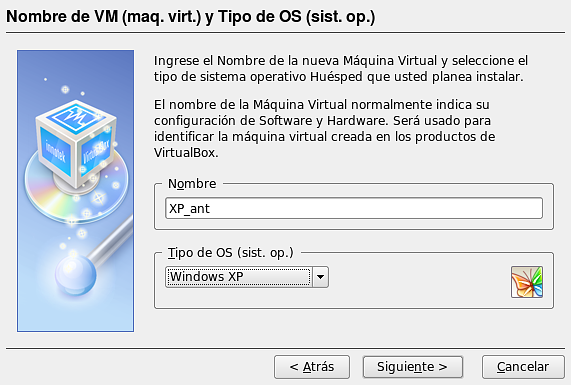
Creamos una NUEVA máquina:
VB.01.Crear_Nueva_VM.png74.6 KB
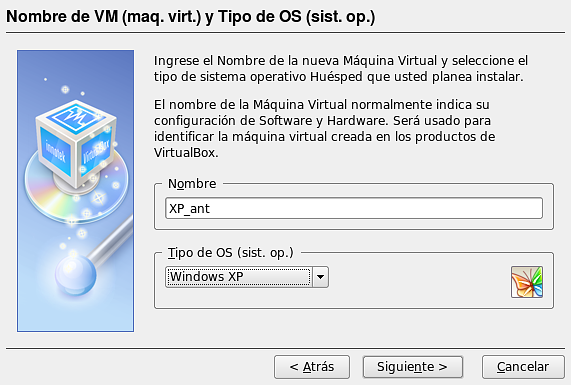
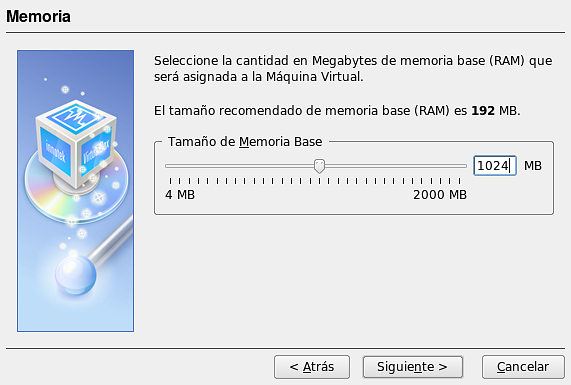
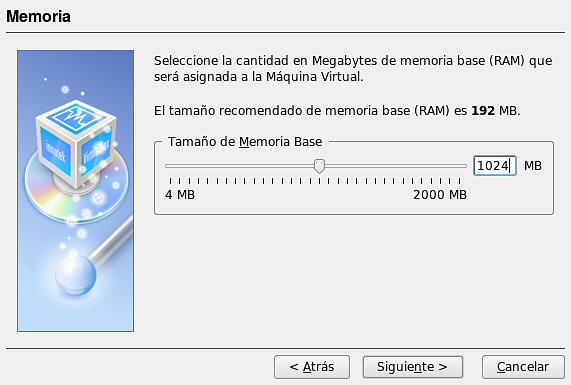
Seleccionando como sistema huesped el Windows XP. En la siguiente pantalla asignaremos la memoria RAM:
VB.02.Asigna_memo.png61.9 KB
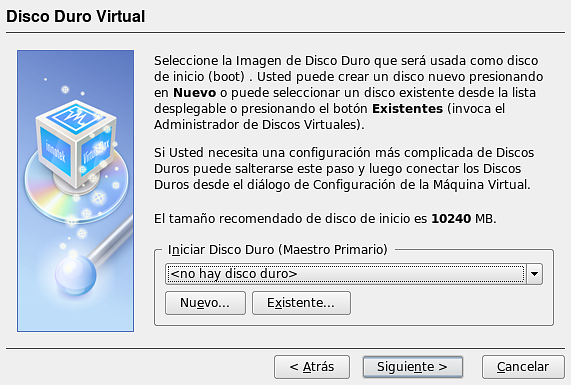
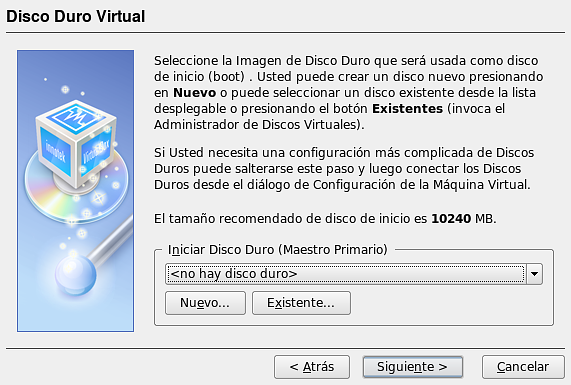
No asignaremos ningún disco duro virtual, lo haremos a través de consola en el punto siguiente.
VB.03.Disco_duro.png80.4 KB
Enlazar la VM a la partición
En el punto 9.9 del Manual de usuario de VirtualBox tenemos la forma de proceder para crear un disco duro virtual, a partir de una partición física. Ejecutamos lo siguiente en la línea de comandos:
De modo que crearemos el disco virtual file.vmdk referenciando al dispositivo /dev/sda.
Para utilizar ese disco desde el fichero de referencia tienes que añadir a tu usuario normal (con el que vas a arrancar la máquina virtual) al grupo de sistema disk:
sudo usermod -a -G disk
Abre el archivo /etc/group y modifica con tu usuario una linea similar a esta:
vboxusers:x:120:USUARIO
Reiniciamos la máquina para que estos cambios surtan efecto. Y lo asociaremos a la máquina virtual creada anteriormente mediante el siguiente comando:
Jun 23, 08 by Juan Lebrijo about virtualization, blog
vbox_logo2_gradient.png28.3 KB In order to show you the VirtualBox potential, and make easy the migration to Ubuntu for the users of XP, who want to use it from Ubuntu. We are going to see how you can virtualize an made XP partition from Ubuntu 8.04 suing VirtualBox.
We can find the same solution with VMware Workstation at Kriptópolis (Spanish), but this product can be used 30 days. I probed with the free VMware Server product, but it do not provide the partition virtualizing property.
Then with no doubt we can say that VirtualBox is the most durable solution, although Open Source.
Ensure the correct VirtualBox Edition
Take care at first on the installed VirtualBox version, it must be the commercial one (not the OSE one). The other has not the possibility to visualize physical partitions, from a Virtual Machine. We take the explanation of this at this link.
Copy a Hardware Profile in our Windows XP System
The next caution is to create a sencond "Hardware Profile" at our XP System, because when we boot our Virtual Machine the hardware is the standard provided by VirtualBox, and XP will start to detect and install, and remove the old drivers.
On this way we could boot our XP partition from GRUB choosing a "Hardware Profile" not modified. We can create this profile at: Right mouse button over My PC > Properties > Hardware > Hardware Profiles > Copy; and create the second Profile "Profile 2" which will be the modificated on the first boot from VirtualBox:
xp_mipc_perfiles.PNG148 KB
Create a Virtual Machine
First we have to create the Virtual Machine with the usual steps.
Create anew machine:
VB.01.Crear_Nueva_VM.png74.6 KB
Selectin Windows XP as guest System. In the next screen we have to asign the RAM memory:
VB.02.Asigna_memo.png61.9 KB
We do not assign any Virtual Hard Disc, we will do it through the terminal in the following point.
VB.03.Disco_duro.png80.4 KB
Linking the VM to the partition
At the poit 9.9 in the VirtualBox Users Manual we have the way to procceed to create a Virtual Hard Disk, from a physical partition. Execute the following command:
Then we will create the Hard Disk file.vdk referenced to the /dev/sda device.
To use this disk you must to add your user to the disk system group (to manage dthe sda device)P:
sudo usermod -a -G disk
Open the file /etc/group and modify your user in a line like this (to manage the applicatiion):
vboxusers:x:120:USUARIO
Reboot the system to make theese changes. And bind the HD file to the Virtual Machine with the following command: