Jul 02, 10 by Juan Lebrijo about Web, Java, Eclipse, blog
Existe una forma de crear plantillas muy básica con JSP a base de includes, que nos puede servir para salir del paso, para un proyecto muy pequeño, por que no queramos utilizar tecnologías más pesadas, o queramos desplegar nuestro proyecto en cualquier servidor de aplicaciones.
La técnica trata de crear pequeños trozos de código en JSP (jsf, tags,...) para cabecera y pie. Y luego crear todas las páginas del proyectos a partir de una plantila.
En eclipse bastaría con crear un New ... > Dynamic Web Project, que llamaremos basic_templating
La plantilla de cualquier página será:
De esta foma definimos los estilos aplicados a todo el proyecto en /style/templates/styles.jsp:
La cabecera y el pié de toda la aplicación estará en:
/style/templates/header.jsp
/style/templates/footer.jsp
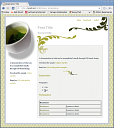
Podemos ver el resultado en el siguietne pantallazo:
basic_templating.thumbnail.png15.8 KB
Os dejo el proyecto en un eclipse zip file
Jun 27, 10 by Juan Lebrijo about Oracle, Database, JDeveloper, blog
I consider JDeveloper as a great data base design tool for some reasons:
It can navigates through the Oracle databases
It has a very good ER editor.
It can change the data base schema when you modify the diagram
We can download from Oracle's web the last JDeveloper version for our operating system. Installing is very easy, you just must have installed the JDK.
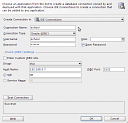
To connect the database which we create in a early post select the upwards menu View > Database > Database Navigator. And over "IDE connections" click with right button selecting "New connection". You must configure the connection as shows the figure:
jdev_create_db_connection.thumbnail.png8.28 KB
Now we will create an application called "School", click in "New Application", where you want, with the template "Generic Application". I will call the project "CertificatesEmitter".
The Diagram
With right button over the project we create the diagram: New... > Database Tier > Database Objects > Database Diagram. I call it "SchoolDB". It creates the file SchoolDB.db_diagram as shows the following figure.
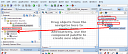
Before we create the connection to our data base in the IDE, but now we must carry it to the application. We can do this dragging an drop, as we can see in the figure, from the "IDE Connections" window to "Application Resources":
connection_resource2project.thumbnail.png8.8 KB
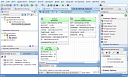
In the middle we can see a grid, this is the zone where we will edit our data model. In right hand we have the Component Palette, and we will construct tables, sequences,... with wizards:
db_editor.thumbnail.png11.5 KB
When yo create a table, if you want the changes persist in your data model, you must to specify the location, which will be the "school" connection imported before.
Editing the data base
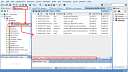
In the figure we show you the navigator window which JDeveloper holds:
database_navigator.thumbnail.png9.88 KB
We can editing every object clicking over it. And through the foot tabs we can edit data, fields, triggers,....
To create the export script just click with right button over the object and select > Export Data > insert...
Reverse Egineering
In the same application we are going to create the RevEngProject project. With right button: New... > Database tier > Copy Database Objects to a Project. With School connection we create OfflineDB SchoolDBRev, and import the last created objects. We select to generate the DDL CREATE sentences.
Then we have the reverse engineering objects that we can drag and drop to a new diagram to see the ER model.
Generate DDL script
At this point we can generate the data base structure script from the connection and from the reverse engineering imported objects. Over the DB offline folder, with the right button: New ... > Database tier > Offline Database Objects > SQL generated from Database Objects.
Here I put the generated files in this post:
Jun 27, 10 by Juan Lebrijo about Oracle, Database, JDeveloper, blog
Considero JDeveloper como una buena herramienta para el diseño de bases de datos por algunas razones:
Es capaz de navegar muy bien las bases de datos Oracle.
Tiene un editor de esquema ER muy bueno.
Es capaz de modificar la base de datos cuando estás modificando el esquema.
De la misma web de Oracle podemos descargar la última versión de JDeveloper para nuestro sistema operativo. Instalarlo no implica mucha dificultad, basta con tener la JDK de Java.
Para conectar la base de datos que creamos en un artículo anterior seleccionamos del menú superior View > Database > Database Navigator.Y sobre"IDE connections" con el botón derecho seleccionamos "New connection". Configuramos la conexión como aparece en la figura:
jdev_create_db_connection.thumbnail.png8.28 KB
Ahora crearemos una aplicación de nombre "School", pinchando en "New Application", en la ubicación que queráis, con la plantilla de "Generic Application". El proyecto lo llamaremos "CertificatesEmitter".
El Diagrama
Con el botón derecho sobre el proyecto creamos el diagrama: New... > Database Tier > Database Objects > Database Diagram.Yo lo llamaré "SchoolDB". Nos crea el fichero SchoolDB.db_diagram como vemos en la siguiente figura.
Antes hemos creado la conexión a nuestra base de datos en el IDE, pero ahora hay que traerla a la aplicación. Esto se hace pinchando y arrastrando, como se muestra en la figura, desde la ventana "IDE Connections" a "Application Resources":
connection_resource2project.thumbnail.png8.8 KB
Vemos en medio una cuadrícula que es la zona donde editaremos nuestro modelo de datos. A la derecha tenemos la paleta de componentes, e iremos confeccionando tablas, secuencias, ... con wizards:
db_editor.thumbnail.png11.5 KB
Cuando creéis la tabla, si queréis que todos los cambios se actualicen en la base de datos, tenéis que especificar la localización, que será la de la conexión "school" anteriormente importada.
Editando la Base de Datos
En la figura os mostramos la ventana de navegación por las base de datos que tiene JDeveloper:
database_navigator.thumbnail.png9.88 KB
Haciendo doble clic sobre cualquier objeto lo podemos editar. Y a través de las pestañas de abajo podemos editar los datos, los campos, triggers,....
Para crear el script de exportación de datos basta con hacer botón derecho contra el objeto > Export Data > insert...
Ingeniería Inversa
Dentro de la misma aplicación creamos el proyecto RevEngProject. Con el botón derecho: New... > Database tier > Copy Database Objects to a Project.Con la conexión School llamamos a la OfflineDB SchoolDBRe, e importamos los objetos que hemos creado anteriormente. Seleccionamos que genere las sentencias DDL de CREATE.
Con esto tenemos los objetos de ingeniería inversa que podemos arrastrar a un nuevo diagrama para ver su estructura.
Generar el script DDL
En este punto podemos generar el Script de creación de la estructura de datos a partir tanto de la conexión como de los Objetos importados por ingeniería inversa. Sobre la carpeta de offline DB, con el botón derecho: New ... > Database tier > Offline Database Objects > SQL generated from Database Objects.
Dejo los ficheros generados en este artículo: